 AI Mobile Coders
AI for iOS Developers: The Complete Roadmap
How to use AI to build iOS apps faster, and how to build AI features into your apps. Explained step by step, beginner to advanced.If you are an iOS developer in 2026 and you are not using AI yet, you are not “behind,” but you are definitely working harder than you need to.

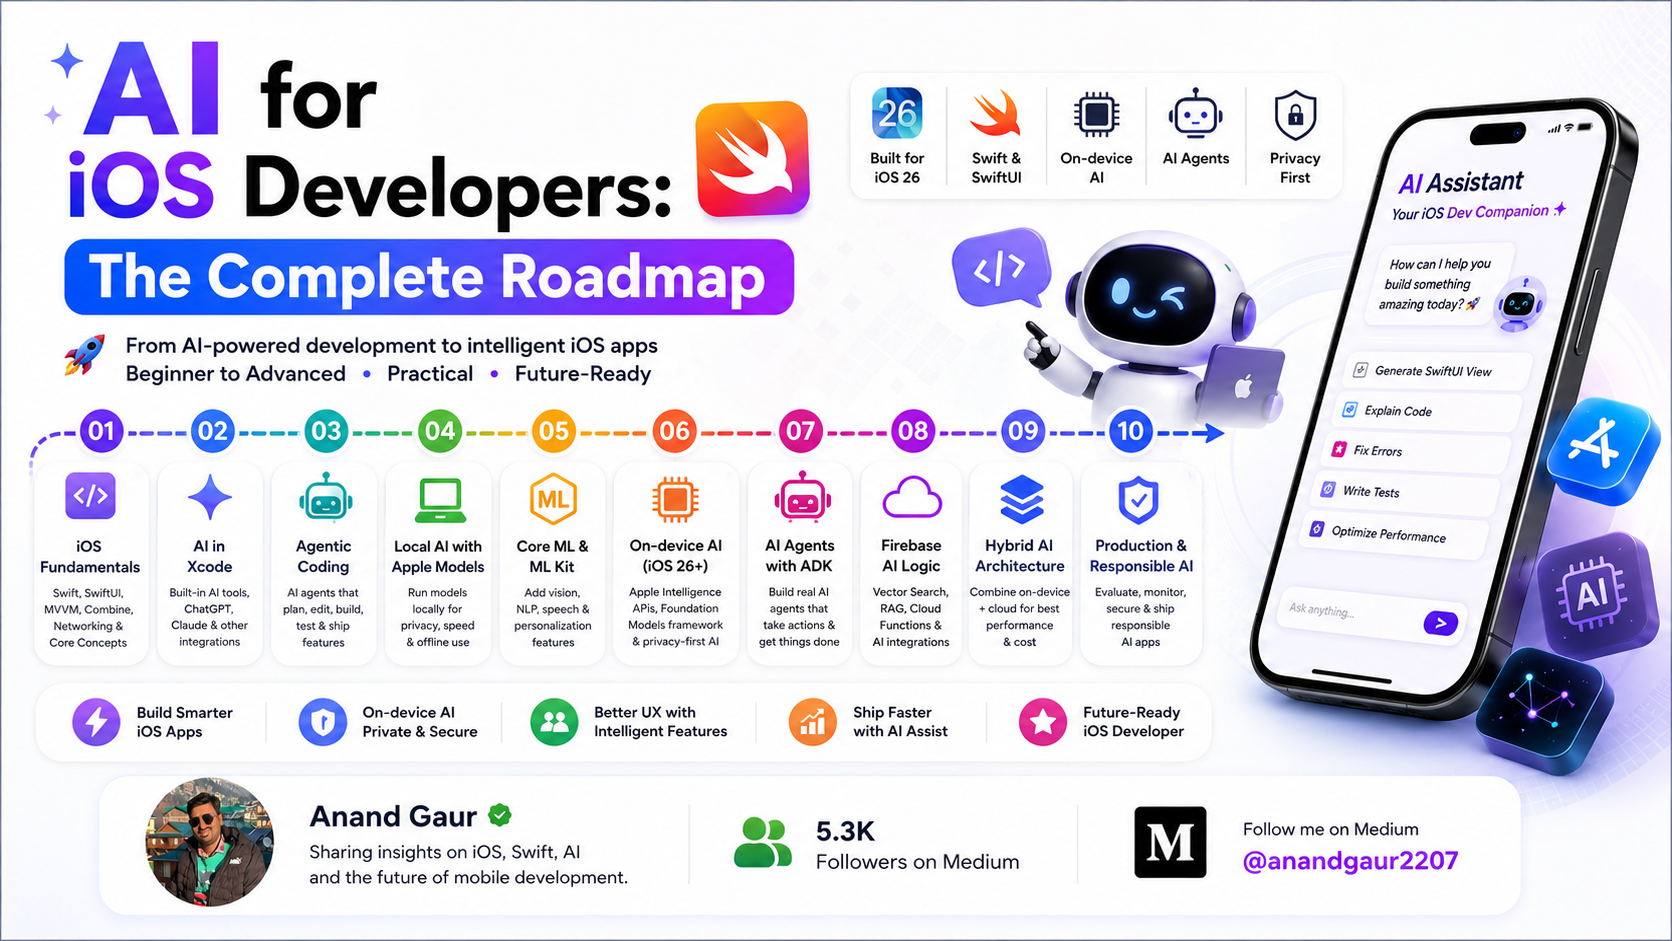
If you are an iOS developer in 2026 and you are not using AI yet, you are not “behind,” but you are definitely working harder than you need to.
AI has quietly become a normal part of iOS development. It now sits inside Xcode helping you write code, and it sits inside the apps users download, making those apps feel smart. Two different things. Both matter. And most blogs mix them up into one confusing mess.
This roadmap keeps them clean and separate.
Part 1 is about you using AI to build apps faster, through the AI assistant living inside Xcode.
Part 2 is about your app using AI, adding smart features like summarizing, translation, and image understanding into the apps you ship.
We will go from absolute basics to advanced, in the right order, in plain English. By the end you will know exactly what to learn, in what sequence, and what to build at each step.
One quick prerequisite. This roadmap assumes you can already build a basic iOS app. You know Swift, you know SwiftUI, and you understand things like the MVVM pattern and making a network call. If you cannot do that yet, learn those fundamentals first. AI is an accelerator. It works best on top of real understanding, not instead of it.
A second note: AI on Apple platforms changed a lot recently. The big turning point was iOS 26, when Apple opened up its on-device AI to ordinary developers for the first time. This roadmap is written for today’s iOS.
Let’s begin.
PART 1: Using AI to Build iOS Apps Faster
This part is about the AI assistant built into your tools. For iOS, that means the intelligence features inside Xcode, Apple’s official development app, which now has AI assistance built right in.
It is not a separate app. It is built into the Xcode you already use, in the Intelligence settings and the coding assistant panel.
Stage 1: Get Set Up (Day 1)
Good news: there is almost nothing extra to install. Modern Xcode (version 26 and later) already includes AI coding features.
The interesting part is which AI model you use. Apple made Xcode unusually open here. You have several choices:
- The built-in predictive code completion. Apple ships a model that runs locally for fast, in-line code suggestions as you type. It works out of the box.
- ChatGPT, built in. Xcode includes a ChatGPT integration you can switch on with a few clicks. There is a limited free daily allowance. If you have a paid ChatGPT plan or your own API key, you can connect it to remove those limits.
- Other providers, like Claude. Xcode lets you plug in other AI providers, most notably Anthropic’s Claude, by signing in or entering an API key. Apple worked directly with Anthropic and OpenAI to make their models work well inside Xcode.
- Local models. You can even point Xcode at an AI model running on your own machine, if you want full privacy and offline coding help.
The takeaway is that you are not locked into one AI. Open Xcode’s settings, find the Intelligence section, pick a model, sign in, and you are ready. That is the whole setup. Start with the built-in completion and ChatGPT, then explore Claude and others as you go.
Stage 2: Everyday AI Assistance, Your New Daily Habits
This is the level every iOS developer should reach. These are small, safe, high-value uses of AI that you will do dozens of times a day. Build these habits first.
- Explain unfamiliar code. Open a file you do not understand, ask the assistant what it does, and read the explanation. This is the single best way to onboard onto a new codebase or understand an old framework.
- Explore new frameworks. Apple ships new APIs every year. Instead of digging through documentation, ask the assistant “how do I do X with this framework,” because it knows the latest SDKs.
- Fix build and compiler errors. Swift’s error messages can be cryptic. The assistant can read an error and tell you the likely cause and fix.
- Understand crashes. When your app crashes, the assistant can read the crash report and stack trace, point to the probable cause, and suggest a fix.
- Generate SwiftUI views. Describe a screen in plain language and get a first draft of the SwiftUI code. You then refine it.
- Write boilerplate. Model structs, view model skeletons,
Codabletypes, mapping functions: the boring, repetitive code. Let AI write the first draft. - Write tests. Ask it to generate unit tests for a view model or a function. Reviewing and fixing AI-written tests is far faster than writing them from scratch.
- Write documentation and commit messages. Comments, doc strings, README sections, and clear Git commit messages.
The pattern for all of these is the same: AI writes the first draft, you review and correct. Never the other way around.
Stage 3: Agentic Coding, Letting AI Do Bigger Jobs
This is the next level up, and it is where things get genuinely powerful. Recent Xcode versions added agentic coding.
The difference between “chat” and “agent” is important. In chat, you ask a question and get an answer. With an AI coding agent, you describe a goal, and the AI:
- breaks the task into steps,
- explores your whole project structure to understand it,
- creates and edits files across the project,
- builds the project and runs tests,
- takes image snapshots to double-check the result looks right,
- and works through the task step by step until it is done.
Apple worked directly with Anthropic and OpenAI so their agents, Claude’s agent and OpenAI’s Codex, plug into Xcode with a single click in settings. These agents can access Xcode’s full toolchain and Apple’s developer documentation, which has been specially prepared for AI agents. Under the hood this is built on a standard called MCP (Model Context Protocol), so the agent capabilities are not locked to Xcode’s window alone.
You stay in control. The agent shows you what it is doing, and you sign in with your own account (usage is billed through that provider).
Good tasks to hand an agent: “add a settings screen with a dark mode toggle,” “refactor this view model to use async/await,” “generate unit tests for this whole folder,” “fix all the warnings in this file.”
Stage 4: Working With AI Well, the Skill That Actually Matters
Here is the honest truth that separates developers who benefit from AI from developers who get burned by it.
AI is not magic and it is not your replacement. It is a fast, confident junior developer who is sometimes brilliant and sometimes completely wrong, and never tells you which is which. Your job is to be the senior who reviews everything.
Follow these rules and you will do well:
- Never ship code you do not understand. If AI writes something and you cannot explain why it works, do not commit it. Ask it to explain, or rewrite it yourself. Code you do not understand is a debt that comes due at the worst possible time.
- Prompt with specifics. Vague prompts get vague code. Tell it your architecture, your minimum iOS version, your patterns. Give examples of code style you like.
- Be firm with instructions. When working with brand-new APIs, explicitly tell the model not to invent things, because AI sometimes “hallucinates” methods that do not exist. Clear instructions reduce this.
- Iterate. The first output is rarely perfect. Refine your prompt, add detail, and try again. Treat it as a conversation.
- Review everything for security and correctness. AI does not always know your app’s security needs or edge cases. You do.
- Keep your fundamentals sharp. The developers who thrive use AI to go faster at things they understand, not to avoid understanding. Keep learning Swift and the platform itself.
Beyond Xcode’s built-in features, there are other capable AI coding tools, including standalone editors and agents that also work for Swift. They are worth knowing about. But Xcode’s built-in intelligence has one real advantage: it understands Apple’s frameworks, conventions, and the latest SDKs natively. Start there, then explore.
Milestone for Part 1: AI assistance is a natural, daily part of how you work, and you never feel like you have lost control of your own codebase.
PART 2: Building AI Features Into Your Apps
Now we switch sides completely. Part 1 was about you using AI. Part 2 is about your users getting AI features inside the apps you build.
This is where you become genuinely valuable, because “the app that has a smart feature” beats “the app that doesn’t” almost every time.
Stage 5: Understand the Apple Way, On-Device First, Privacy First
Before any code, understand how Apple thinks about AI, because it shapes every tool you will use.
Apple’s whole AI system is called Apple Intelligence, and its guiding idea is privacy through on-device processing. Where other platforms send your data to a server by default, Apple’s default is to run AI on the user’s device so the data never leaves it.
There are three places AI can run, and you should know all three:
- On-device. The model runs directly on the iPhone or iPad, using Apple’s chips (the CPU, GPU, and Neural Engine). It is private, fast, works offline, and free to run. This is Apple’s default and your default too.
- Private Cloud Compute. When a task is too big for the device, Apple can send it to special Apple servers built with the same privacy protections, where your data is not stored and not used for training. This is Apple’s middle ground.
- External cloud models. For things Apple’s own models do not do, you can call outside services such as large general-knowledge models. This is the least private option, so use it deliberately and tell users.
The key mindset for an iOS developer is this: start on-device, and only reach for the cloud when you genuinely need to. This is the opposite habit from other platforms, and it is one of the best things about building AI features on Apple’s platforms.
Stage 6: The Foundation Models Framework, On-Device Generative AI
This is the heart of modern AI on iOS, so slow down and enjoy it.
The Foundation Models framework (introduced in iOS 26) is the big one. For the first time, it gives any developer direct access to the on-device large language model that powers Apple Intelligence, a roughly 3-billion-parameter model that runs entirely on the user’s device. No API key. No cloud cost. No internet required. Free.
One important expectation to set: this on-device model is not a general-knowledge chatbot. It is not built to answer “who won the World Cup in 1998.” It is built to be a language engine for your app’s features. It is excellent at summarization, pulling structured information out of text, classifying content, refining and rewriting text, short dialogue, and generating creative text. Think “smart feature inside your app,” not “ChatGPT clone.”
What to learn here, in order:
- Checking availability. Not every device supports Apple Intelligence, and the user must have it enabled. Your very first step is always to check whether the model is available, and design a sensible fallback when it is not.
- The basic request flow. You get the system language model, create a session, and send it a request, getting either a complete response or a streamed one (text appearing as it is generated). This is the core loop.
- Guided generation, the standout feature. This is what makes the framework feel genuinely Swift-native. Instead of getting back messy text you have to parse, you mark a Swift struct or enum with a special annotation (the
@Generablemacro), and the model fills it in directly as a clean, type-safe Swift object. You ask for aRecipestruct, you get aRecipestruct. This removes a whole category of fragile parsing code. - Tool calling. The on-device model can call functions in your app. Instead of just producing text, it can say “I need today’s weather, so call the app’s weather function.” This lets your AI feature pull in real, fresh data.
- Streaming, sessions, and context. How to keep a short conversation going, and how to feed the model the right context for good results.
Because all of this runs on-device, it is private, works offline, and costs you nothing per request, which is a huge deal for features touching personal data like notes, messages, health, or finance.
Project for this stage: add one real on-device feature to a small app. A summarizer for long notes, a “generate flashcards from this text” feature, or a tool that extracts structured data (such as turning a messy paragraph into a clean list of tasks).
Milestone: you have shipped an app feature powered by Apple’s on-device language model, with a graceful fallback for unsupported devices.
Stage 7: Core ML and the Ready-Made AI Toolkits
The Foundation Models framework handles language. But “AI in an app” is much broader than text. It includes images, sound, and more. Apple has mature, easy tools for all of it, and you should know them.
- Core ML is Apple’s framework for running machine-learning models on-device. It is the foundation under almost all on-device AI on iPhone. You can use models Apple provides, models from the community, or your own. Tools like Create ML even let you train simple custom models without deep machine-learning knowledge.
- The Vision framework handles images: detecting faces, recognizing text in a photo (OCR), reading barcodes, classifying images, tracking objects, and more. It is perfect for camera-based features.
- Natural Language framework handles text analysis: language identification, finding names and places, sentiment (is this text positive or negative), and more.
- Speech framework handles speech-to-text, turning what the user says into text.
- Sound Analysis can recognize sounds and audio events.
- Translation framework does on-device translation between languages.
These frameworks have existed and matured for years. They are rock-solid, run on-device, and are the perfect way to add a focused AI feature quickly. You do not train anything or understand the math. You call an API and get a result.
A simple mental model: use the Foundation Models framework when the task is about understanding or generating language; use Vision, Speech, Natural Language, and Translation when the task is about images, sound, or text analysis; and reach for Core ML directly when you have a specific custom model to run.
Milestone: you can add a ready-made AI feature, such as text recognition, translation, or sound and image classification, to any app in an afternoon.
Stage 8: App Intents, Making Your AI Features Part of the System
Here is something many developers miss. On iOS, an AI feature is far more powerful when the system can use it, not just your app’s own screens.
App Intents is the framework that exposes your app’s actions and content to the rest of the system: to Siri, to Spotlight search, to Shortcuts, to the Action Button, and to Apple Intelligence itself.
Why this matters for AI: when you define your app’s key actions as App Intents, you let the user trigger them by voice, by shortcut, or through system-wide intelligence, without opening your app at all. A note app that exposes a “create note” intent can have a note created by Siri. A workout app that exposes “start a run” becomes part of the user’s natural flow.
Learn the basics of defining intents, entities (your app’s content types), and how they connect to Siri and Shortcuts. Combined with the Foundation Models framework, this is how you build AI features that feel like a natural part of the iPhone, not a feature buried three taps deep.
Milestone: at least one of your app’s actions can be triggered through Siri, Shortcuts, or Spotlight.
Stage 9: Cloud AI, When the Device Is Not Enough
The on-device model is fantastic, but it has limits. It is small, it has a limited context size, and it is not a general-knowledge expert. When you need real power, such as long documents, deep reasoning, broad world knowledge, image generation, or advanced conversation, you go to the cloud.
There are two routes:
- Apple’s Private Cloud Compute, for tasks that extend Apple Intelligence while keeping Apple’s privacy guarantees.
- External AI providers, calling models from companies like OpenAI, Anthropic, or Google directly. This is covered in detail in the “Third-Party AI APIs” section below.
The most important rule for the external route, stated once and clearly: never put an API key inside your iOS app. A key shipped in your app can be extracted by anyone and used to run up your bill. The correct, professional pattern is always the same: put a thin backend server in the middle. Your app talks to your server, and your server holds the key and talks to the AI provider. Treat this as non-negotiable for any real app.
What to learn for cloud AI in general:
- REST APIs and JSON. Almost every cloud AI provider is just a REST endpoint. If you know
URLSession(or a library like Alamofire) to make a network call, you can already use them. - Streaming responses. For long answers, stream the output so text appears gradually instead of making the user stare at a spinner.
- Multimodal input. Modern cloud models can understand images, audio, and documents, not just text. This unlocks features like “ask questions about this photo” or “summarize this PDF.”
- Handling the real world. No internet, slow internet, rate limits, server errors, and cost. Build for all of them.
The hybrid approach. The best apps combine both: do it on-device with the Foundation Models framework when possible, and fall back to the cloud when the task is too big. Design your feature so the user gets the best experience their device and connection allow.
Milestone: you can build a real cloud-powered AI feature, such as a document chat, a smart assistant, or an image-based search, securely, through your own backend.
Stage 10: Advanced, Custom Models, Prompt Engineering, and Doing It Properly
This is the senior level. Once you are comfortable with the Foundation Models framework, Core ML, and cloud AI, here is what takes you further.
- Custom models. Train your own model with Create ML, or convert a model into Core ML format (using Apple’s
coremltools) so it runs efficiently on-device. Learn this when the ready-made frameworks cannot do your specific task. - Prompt engineering as a real skill. In production, the quality of an AI feature depends heavily on how you write the prompt, even for the on-device model. Learn to write clear, constrained prompts; to give examples; to use the framework’s guided generation so output is reliably structured; and to set clear instructions that define the AI’s role.
- Grounding and reducing hallucinations. AI models sometimes confidently make things up. Learn techniques to ground responses in real data, feeding the model your own trusted information so it answers from facts, not guesses. (The general idea is often called RAG, retrieval-augmented generation.)
- Performance. On-device AI uses battery and memory. Learn to profile it with Instruments, run the model off the main thread so the UI never freezes, and cache results where it makes sense.
- The hybrid architecture, properly designed. Combine on-device and cloud thoughtfully, with smart caching and clean fallbacks, so the experience is seamless.
- Cost, latency, and evaluation. Cloud AI costs money and adds delay. Choose the cheapest model that is good enough, cache results, and evaluate your AI feature: have a way to check the output is actually good, not just “it ran without crashing.”
Stage 11: Responsible AI, the Part You Cannot Skip
Adding AI to an app is not just a technical task. It is a responsibility. Before you ship any AI feature, think about this:
- Privacy and transparency. Tell users when AI is involved and what happens to their data. If data goes to an external cloud, say so clearly. Prefer on-device processing for anything sensitive, and on Apple’s platforms this is the easy and natural default.
- Handle wrong answers. AI will sometimes be wrong. Design the feature so a wrong answer is not dangerous. Let users review and edit AI output, especially for anything important. Never let the AI silently do something irreversible.
- Safety and abuse. Generative models can produce harmful or inappropriate content if misused. Use the safety measures the frameworks provide (Apple’s frameworks include built-in guardrails), and think about how your feature could be abused.
- Set expectations. Make it clear to users that a feature is AI-powered and may not be perfect. Honest framing builds trust; overpromising destroys it.
- Accessibility and fairness. Make sure your AI features work well for all your users, not just some of them.
- Follow App Store rules. Apple has guidelines for AI features. Review them before you submit.
A great AI feature is not the flashiest one. It is the one that is genuinely helpful, honest about its limits, and respectful of the people using it.
A Realistic Timeline
For a developer who already knows iOS basics, here is a sane pace:
- Week 1: Set up the AI features in Xcode. Build the daily habits from Stage 2.
- Weeks 2 to 3: Get comfortable with agentic coding (Stage 3), and lock in the good-practice discipline of Stage 4.
- Weeks 4 to 6: Learn the Foundation Models framework and ship one on-device generative feature (Stage 6).
- Weeks 7 to 8: Add a Core ML, Vision, or Speech feature to a small app (Stage 7).
- Weeks 9 to 10: Connect a feature to the system with App Intents (Stage 8).
- Weeks 11 to 13: Build a cloud-powered AI feature through your own backend (Stage 9).
- Month 4 onward: Advanced topics, including custom models, prompt engineering, hybrid architecture, and responsible AI (Stages 10 and 11), learned through real projects.
This is a guide, not a rule. Go at the pace that lets you actually understand each step.
Project Ideas to Build Along the Way
Reading this roadmap will not make you good at AI features. Building will. The projects below are grouped by stage, and most solve a real everyday problem, which also makes them great portfolio pieces.
Starter projects (Stages 6 and 7), learn the basics:
- A smart note-taking app that uses the on-device Foundation Models framework to summarize and rewrite messy notes.
- A document scanner using Vision framework text recognition, plus the on-device model to organize the text into clean, structured fields.
- An image describer for accessibility that describes photos out loud for visually impaired users.
Real-life problem-solving projects (Stages 6 to 9), solve something that actually matters:
- A medicine reminder for elderly parents. Point the camera at a medicine box or prescription, Vision reads the text, and the on-device model extracts the name, dosage, and timing to set reminders automatically. It works offline, so it is reliable.
- A “what can I cook” app. The user photographs the ingredients they have, and AI suggests recipes they can make right now. It reduces food waste and the daily “what’s for dinner” problem.
- A study helper for students. Snap a photo of textbook pages or handwritten notes, and the app summarizes them, generates flashcards, and creates practice questions. There is real value for exam season, and it can run on-device for privacy.
- A bill and expense splitter. Photograph a shop bill or restaurant receipt, the app reads every line item, and it splits the total fairly among friends. It solves an awkward, common situation cleanly.
- A form-filling assistant. Many people struggle with official forms, especially in a second language. The app reads a form via the camera, explains each field in simple language, and translates it.
- A symptom helper. The user describes how they feel in plain language, and the app explains possible causes simply and suggests which type of doctor to see. Be responsible here: it must clearly say it is not a diagnosis and always recommend seeing a real doctor.
- A “scam message” checker. The user pastes a suspicious text message, and the on-device model flags whether it looks like a scam and explains why. It stays private because nothing leaves the phone.
- A journaling app with insight. The user writes freely, and the on-device model gently summarizes themes and moods over the week, entirely private, never leaving the device.
System-integrated projects (Stage 8), make it feel native:
- A voice-driven task app that exposes “add task,” “complete task,” and “what’s due today” as App Intents, so the whole thing works through Siri and Shortcuts.
- A workout app with a Siri start, where “start my morning run” launches the workout without opening the app.
Advanced project (Stages 9 and 10):
- A “chat with your documents” app. The user adds PDFs (contracts, manuals, reports), asks questions in plain language, and gets answers grounded in those specific documents (cloud, multimodal, with grounding and RAG).
Each one teaches a different piece. Finish them. A finished, slightly rough app teaches more than a perfect tutorial you only watched. And if a project solves a real problem for real people, it belongs on your résumé.
Third-Party AI APIs You Can Use
Apple’s own tools, including the Foundation Models framework, Core ML, Vision, and the rest, are the most natural fit for iOS, and you should reach for them first. But you are not limited to them. Many of the best AI models come from other companies, and you can use almost all of them from an iOS app.
Here is the single most important idea first: almost every one of these is just a REST API. You do not need a special SDK. If you know how to make a network call with URLSession (or a library like Alamofire), you already know how to call them. You send a JSON request, you get a JSON response.
And here is the single most important rule, repeated because it matters: never put these API keys inside your iOS app. Most of these providers have no built-in protection for mobile apps. A key shipped in your app can be extracted and abused, and you pay the bill. Always put a thin backend server in the middle, where your app talks to your server and your server holds the key. This is non-negotiable for any real app.
With that said, here are the main third-party options.
OpenAI (GPT models). The most widely known AI API, behind ChatGPT. Its GPT models are strong all-rounders for chat, reasoning, writing, code, and vision. The API is a simple REST endpoint, and OpenAI’s request format has become so common that many other providers copy it (called “OpenAI-compatible”), which makes switching easier.
Anthropic (Claude models). Claude models are known for strong reasoning, careful instruction-following, long-context understanding, and writing quality, which makes them popular for assistants and document-heavy features. Anthropic provides official SDKs and a clean REST API, and Claude is also one of the models Apple integrated directly into Xcode.
xAI (Grok models). Grok is xAI’s model family. Its API is OpenAI-compatible, which is genuinely convenient, because code or libraries built for OpenAI often work with Grok by just changing the endpoint URL and key.
Google (Gemini models). Google’s Gemini models are strong all-rounders with excellent multimodal abilities across text, images, audio, and video. Google offers a straightforward REST API and SDKs.
Hugging Face. Hugging Face is less “one model” and more “the home of open AI.” It hosts hundreds of thousands of open models for text, images, audio, translation, and more. Its Inference API lets you call many of these hosted models with a simple HTTP request, which is perfect for an iOS app using URLSession. It is great when you want a specialized or open model rather than one big commercial provider.
Other providers worth knowing. The space is wide. Mistral AI offers strong, efficient open-weight models. Cohere focuses on enterprise text, search, and RAG. Groq (note the spelling, different from xAI’s Grok) runs open models extremely fast. OpenRouter is a single API that gives you access to many providers at once through one endpoint, which is useful if you want to switch or compare models without rewriting code.
A practical tip. Because so many of these APIs share the OpenAI-compatible format, you can often build your app’s backend to talk to one interface and swap the model behind it. This is handy for adding a fallback model or letting users choose.
So how do you choose? A simple way to think about it:
- Building an iOS app and want the easiest, safest, most private path? Stay with Apple’s stack: the Foundation Models framework on-device, and Private Cloud Compute when you need more. No keys, no cost, no backend.
- Need a specific model’s strengths, or general world knowledge the on-device model does not have? Use that provider’s API, through your own backend.
- Want open models, variety, or specialized tasks? Hugging Face.
- Want to switch or compare models freely? An OpenAI-compatible setup or OpenRouter.
There is no single “best.” There is only the best fit for your feature, your budget, and your users. The skill is knowing the options exist and choosing deliberately.
Summary
Here is the simplest way to think about everything in this roadmap.
AI now sits on both sides of your work. On one side, it helps you write Swift code faster, through the intelligence features in Xcode, with your choice of ChatGPT, Claude, and more. On the other side, it lets your apps do smart things for users, through the Foundation Models framework, Core ML, Vision, App Intents, and when needed, the cloud. Learn both. They make you twice as valuable.
There is one thing that makes building AI features on Apple’s platforms genuinely special: the on-device, privacy-first default. On iOS, the easiest path is also the most private one, free to run, working offline, with the user’s data never leaving their device. That is a rare and wonderful situation. Lean into it.
But never forget the one principle that runs through this whole roadmap: AI is a powerful tool, and you are still the engineer. It drafts; you decide. It suggests; you verify. It accelerates; you understand. The developers who win in 2026 are not the ones who let AI think for them. They are the ones who think clearly and wield AI well.
So start small. Open Xcode today, turn on the intelligence features, and ask the assistant to explain a file you have been avoiding. Then build one tiny app with one Foundation Models feature. That is Stage 1 and Stage 6 done, and you are already on the road.
You do not need to learn all of this at once. You just need to start. Pick the next stage, build the next small thing, and keep going.
Now go build something smart.
If this roadmap helped you, save it and revisit it at the start of each stage. And remember: every developer shipping impressive AI features today started exactly where you are, at Stage 1, opening Xcode’s Intelligence settings for the first time.
Level Up Your Mobile Developer Interview !
Mastering AI for Android Developers
Your complete hands-on guide to integrating AI into Android apps — covering Generative AI, LLMs, on-device intelligence, AI APIs, real-world use cases, and practical implementation with modern Android development.
👉 Grab your copy now:
https://medium.com/@anandgaur2207/mastering-ai-for-android-developers-5cc6d62e7d21
Cracking the Mobile System Design Interview Book
Your complete practical guide to mastering Mobile System Design Interviews — covering scalable architecture, Android & iOS system design concepts, high-level design strategies, low-level design patterns, performance optimization, offline-first architecture, real-world case.
👉 Grab your copy now:
https://medium.com/@anandgaur2207/cracking-the-mobile-system-design-interview-book-8ff043db0359
Crack Android Interviews Like a Pro
Your complete Android interview preparation book — packed with real questions, deep explanations, and practical insights to help you stand out.
👉 Grab your copy now:
https://medium.com/@anandgaur2207/crack-android-interviews-with-confidence-the-only-handbook-youll-need-b87ec525f19c
iOS Developer Interview Handbook
From Swift fundamentals to advanced iOS concepts — a complete handbook to help you prepare smartly and confidently.
👉 Explore the book:
https://medium.com/@anandgaur2207/crack-ios-developer-interviews-with-confidence-the-complete-ios-developer-handbook-f1eabc3d7a21
Flutter Developer Interview Handbook
Ace your next Flutter interview with scenario-based questions, detailed explanations, and hands-on examples that make you stand out.
👉 Explore the book:
https://medium.com/@anandgaur2207/crack-flutter-developer-interviews-with-confidence-the-complete-flutter-developer-interview-6cb53996832c
React Native Developer Interview Handbook
Crack your next React Native interview with confidence!
This guide is packed with scenario-based questions, detailed explanations, and hands-on examples to help you stand out and succeed.
👉 Explore the book:
https://medium.com/@anandgaur2207/react-native-interview-crack-your-next-interview-with-confidence-0d7255a20fe1
Need 1:1 Career Guidance or Mentorship?
If you’re looking for personalized guidance, interview preparation help, or just want to talk about your career path in mobile development — you can book a 1:1 session with me on Topmate.
I’ve helped many developers grow in their careers, switch jobs, and gain clarity with focused mentorship. Looking forward to helping you too!
Found this helpful? Don’t forgot to clap 👏 and follow me for more such useful articles about Android development and Kotlin or buy us a coffee here ☕
If you need any help related to Mobile app development. I’m always happy to help you.
Follow me on: