 AI Mobile Coders
Building AI-Powered Android Apps with Gemma
AI is no longer limited to servers or cloud APIs. Today, you can run powerful models directly on Android devices - faster, cheaper, and even offline.

AI is no longer limited to servers or cloud APIs. Today, you can run powerful models directly on Android devices — faster, cheaper, and even offline.
One of the most exciting models for this is Gemma, a lightweight open model designed to run efficiently on edge devices like smartphones.
For the last two years, building AI features into mobile apps meant one thing — calling a cloud API. Every chat message, every summary, every smart reply had to travel from the user’s phone to a server in some data center, get processed, and travel back. That worked, but it came with three big problems: it cost money on every request, it broke without internet, and it forced your users to trust their data to a remote server.
In February 2024, Google quietly changed all of this when they released Gemma — an open-source family of AI models small enough to run directly on a phone. Two years later, with the release of Gemma 4 in April 2026, on-device AI on Android has gone from a promising experiment to a production-ready reality. You can now ship features like real-time summarization, voice transcription, image understanding, and even multi-step agentic workflows that run entirely on the user’s hardware — no servers, no API keys, no recurring costs.
This guide is a complete walkthrough of Gemma on Android, written for developers who want to actually build something. We’ll start with the absolute basics — what Gemma is and how it has evolved from version 1 to version 4 — then move into the Android architecture stack, and finally cover three different ways to integrate Gemma into your app, from a no-code 5-minute setup to a full custom implementation. Every step includes working code you can copy and run, real device requirements, and the gotchas I wish someone had told me before I started.
By the end of this guide, you’ll know exactly which Gemma model fits which device, which API to choose for your use case, and how to ship a working on-device AI feature today. Let’s get into it.
What is Gemma?
Gemma is a family of open-source AI language models built by Google DeepMind. Think of Gemma as a smaller, lightweight cousin of Google’s famous Gemini AI — but with one big difference: you can download it, run it on your own device, and even modify it.
Here is the simple idea:
- Gemini = Google’s big AI that runs on Google’s servers (closed-source).
- Gemma = Google’s smaller AI built on the same research, but open-source and runs anywhere — including your Android phone.
Because Gemma runs locally on your device, it gives you four big benefits:
- Privacy — Your data never leaves the phone.
- No internet needed — Works fully offline.
- No cost per request — Once downloaded, every prompt is free forever.
- Low latency — No round-trip to a cloud server, so responses feel instant.
This is why developers are excited. For the first time, you can build apps that have ChatGPT-style intelligence built right inside, without paying for cloud APIs or worrying about user privacy.
The Story of Gemma — From 2024 to 2026
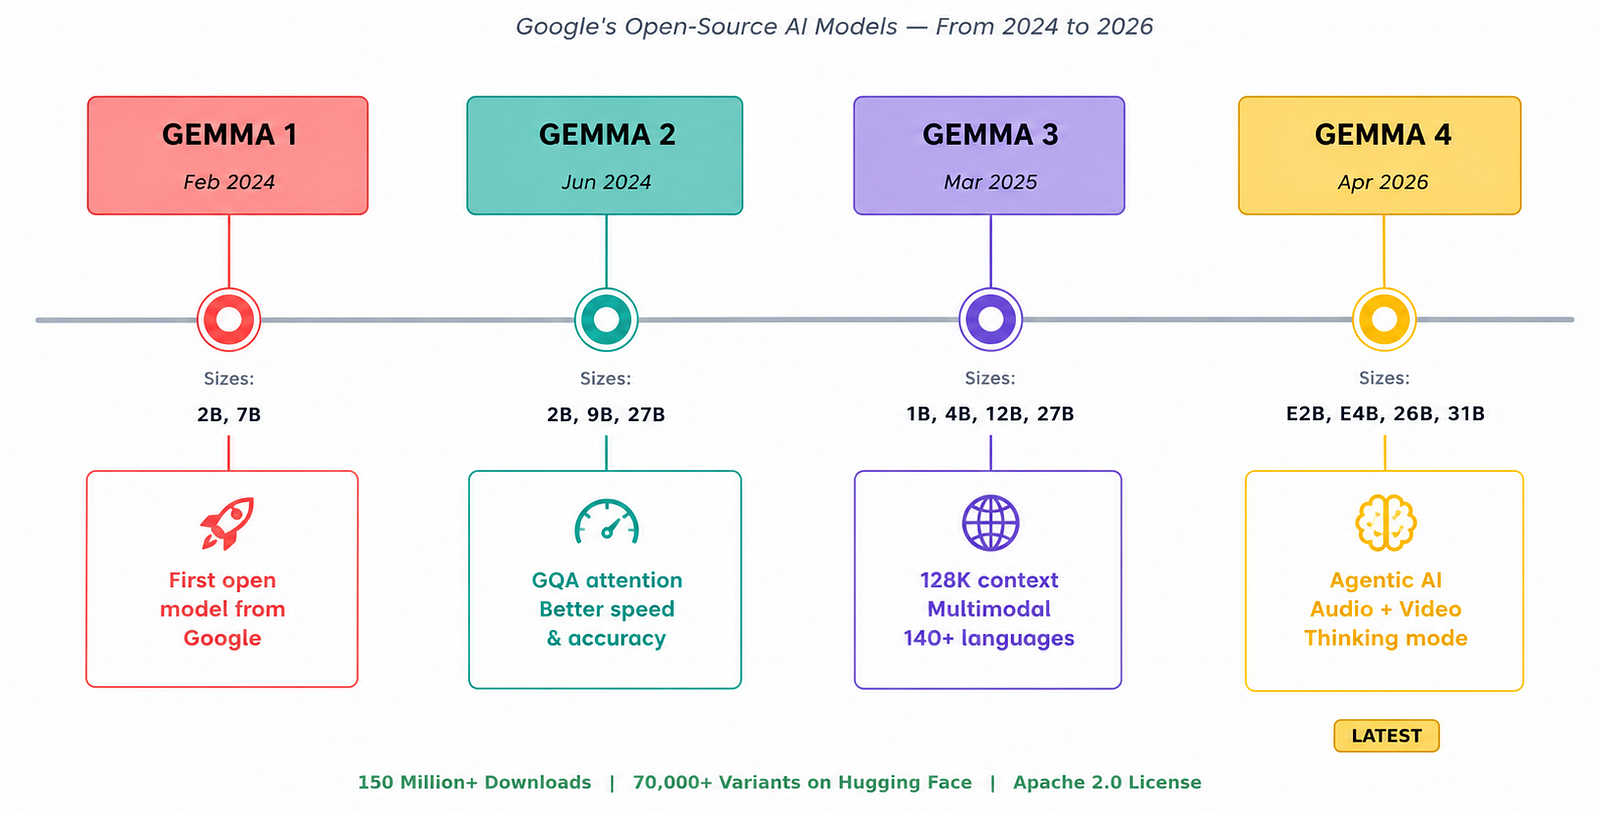
Gemma 1 — February 21, 2024 (The First Step)
Google released the very first Gemma models in two sizes: Gemma 2B (2 billion parameters) and Gemma 7B (7 billion parameters). This was Google’s first major open-source AI release in years and was seen as a response to Meta’s LLaMA models.
These first models were text-only, but they were good enough to run on a laptop or even a high-end phone with some effort. The community loved them, and within months, thousands of fine-tuned versions appeared on Hugging Face.
Gemma 2 — June 27, 2024 (Bigger and Smarter)
A few months later, Google released Gemma 2 in 9B and 27B sizes, followed by a 2B variant on July 31, 2024. The big improvements were:
- Grouped-Query Attention (GQA) — A technical trick that makes the model process content faster while using less memory.
- Better reasoning and instruction-following.
- A separate variant called ShieldGemma for content moderation.
Gemma 3 — March 12, 2025 (Goes Multimodal)
This was a huge jump. Gemma 3 came in 1B, 4B, 12B, and 27B sizes and brought game-changing features:
- 128K context window — You can feed it a whole book or long document in one prompt.
- Multimodal — It can now understand images, not just text.
- Over 140 languages supported.
- Function calling — The model can now use tools (like calling a calculator or weather API).
Google also released Gemma 3n — a special variant optimized for phones and tablets in E2B and E4B sizes (the “E” stands for “Effective” — more on this below).
Gemma 4 — April 2, 2026 (The Latest — Agentic AI)
This is the current generation. Gemma 4 is purpose-built for agentic workflows — meaning the AI doesn’t just answer questions, it can plan multi-step tasks and use tools autonomously. The lineup:
- E2B (Effective 2B) — Runs in under 1.5 GB of RAM.
- E4B (Effective 4B) — Best balance for modern phones.
- 26B Mixture-of-Experts — Server-grade reasoning.
- 31B Dense — Frontier-level performance, ranks #3 on the Arena AI leaderboard.
What’s new in Gemma 4:
- Native audio input on the edge models (E2B and E4B) — speech recognition without internet.
- Video understanding across all models.
- 256K context on the larger models.
- Thinking Mode — You can see the model’s step-by-step reasoning.
- Per-Layer Embedding architecture — That “Effective” 2B label means it has the capability of a 2B model with a much smaller memory footprint, thanks to clever architecture.
Other variants released along the way include CodeGemma (for coding), PaliGemma (vision-language), MedGemma (medical), DataGemma (real-world data), EmbeddingGemma, VaultGemma, and FunctionGemma — a 270M parameter model fine-tuned just for tool calling on phones.
How Gemma Works Inside
Understanding Gemma’s internals helps you make better decisions about which model to use, how to optimise it, and what its limits are.
The Transformer — What Happens to Your Text
Every word you type goes through a precise pipeline before Gemma understands it and before any response is generated.
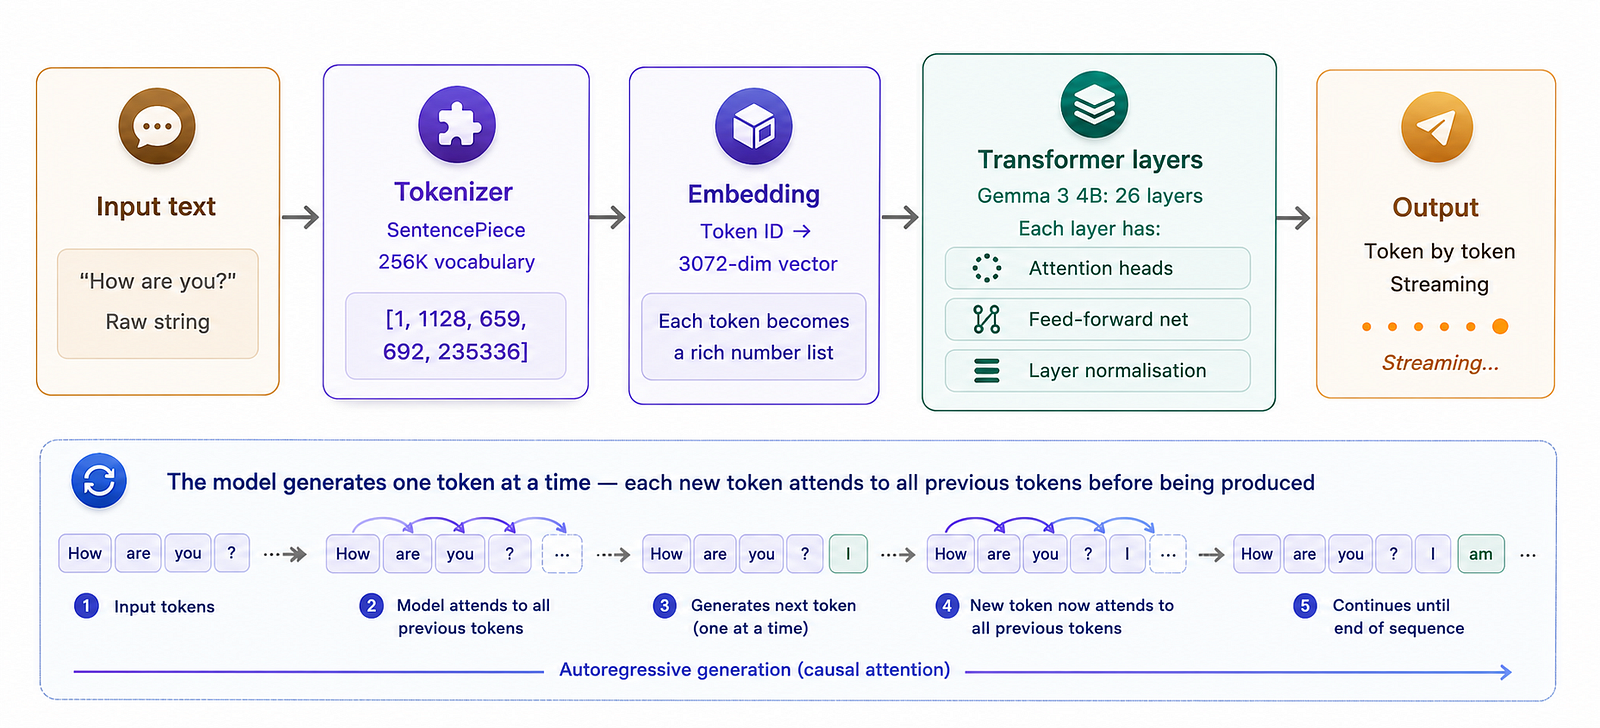
Let me continue building all the remaining diagrams for the Gemma chapter!
Quantisation — How Gemma Fits on Your Phone
The single most important concept for Android deployment is quantisation. Without it, a 4B parameter model would require 16GB of RAM — impossible on any phone. Let’s visualise exactly what happens at each quantisation level:
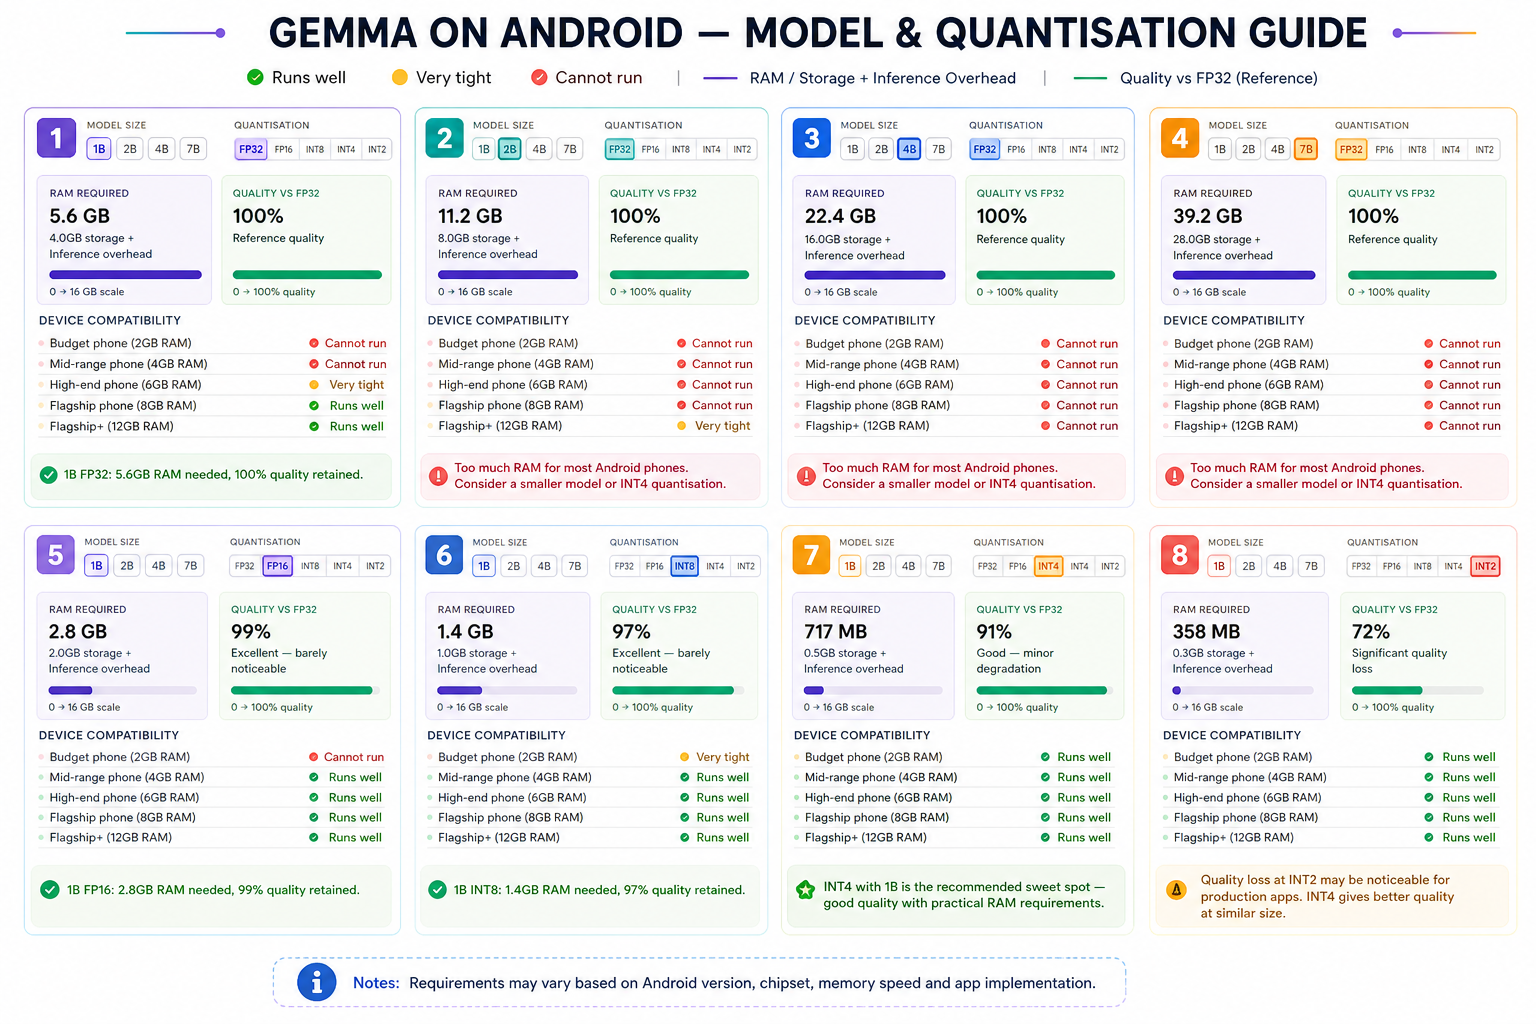
Notice that 4B INT4 hits the sweet spot — good quality (91%) at only ~2.5GB RAM, running comfortably on 4GB phones. Also notice that FP32 of even the 1B model is practically impossible on phones, while INT4 makes even the 4B model very accessible.
The Three Deployment Approaches
Once you have a Gemma model, there are three different ways to run it on Android. Each serves different needs:

The highlighted teal column is the recommendation for most developers. MediaPipe LLM Inference API handles all the complexity of tokenisation, KV caching, and hardware delegation automatically. You focus on your app’s logic, not inference engine internals.
The Gemma Prompt Format — Critical Detail
This is one of the most common mistakes developers make when first using Gemma. Using the wrong prompt format produces poor or confused output. Instruction-tuned Gemma expects a very specific turn structure:
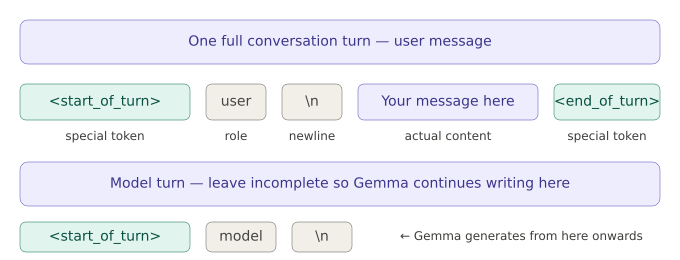
The key insight: you provide the <start_of_turn>model\n at the end without a closing <end_of_turn>. This tells Gemma "this is where you should start writing." The model then generates tokens until it naturally produces <end_of_turn> itself, signalling the end of its response.
Fine-Tuning Pipeline — Making Gemma Yours
Fine-tuning is where Gemma’s open-weight advantage becomes concrete. You can take any Gemma model and specialise it deeply for your domain. Here is the complete pipeline:

The brilliant thing about LoRA for Android deployment: users who already have the base Gemma model (shared via Android AI Core) only need to download your tiny 50–200MB adapter to get your fully specialised domain model. A medical app, a cooking app, and a legal app can all share one base model and each add their own small adapter on top.
The Three-Level Hybrid Architecture
The most robust production pattern uses all three levels together. This is the architecture used by serious Android AI apps that need to serve diverse devices and use cases:
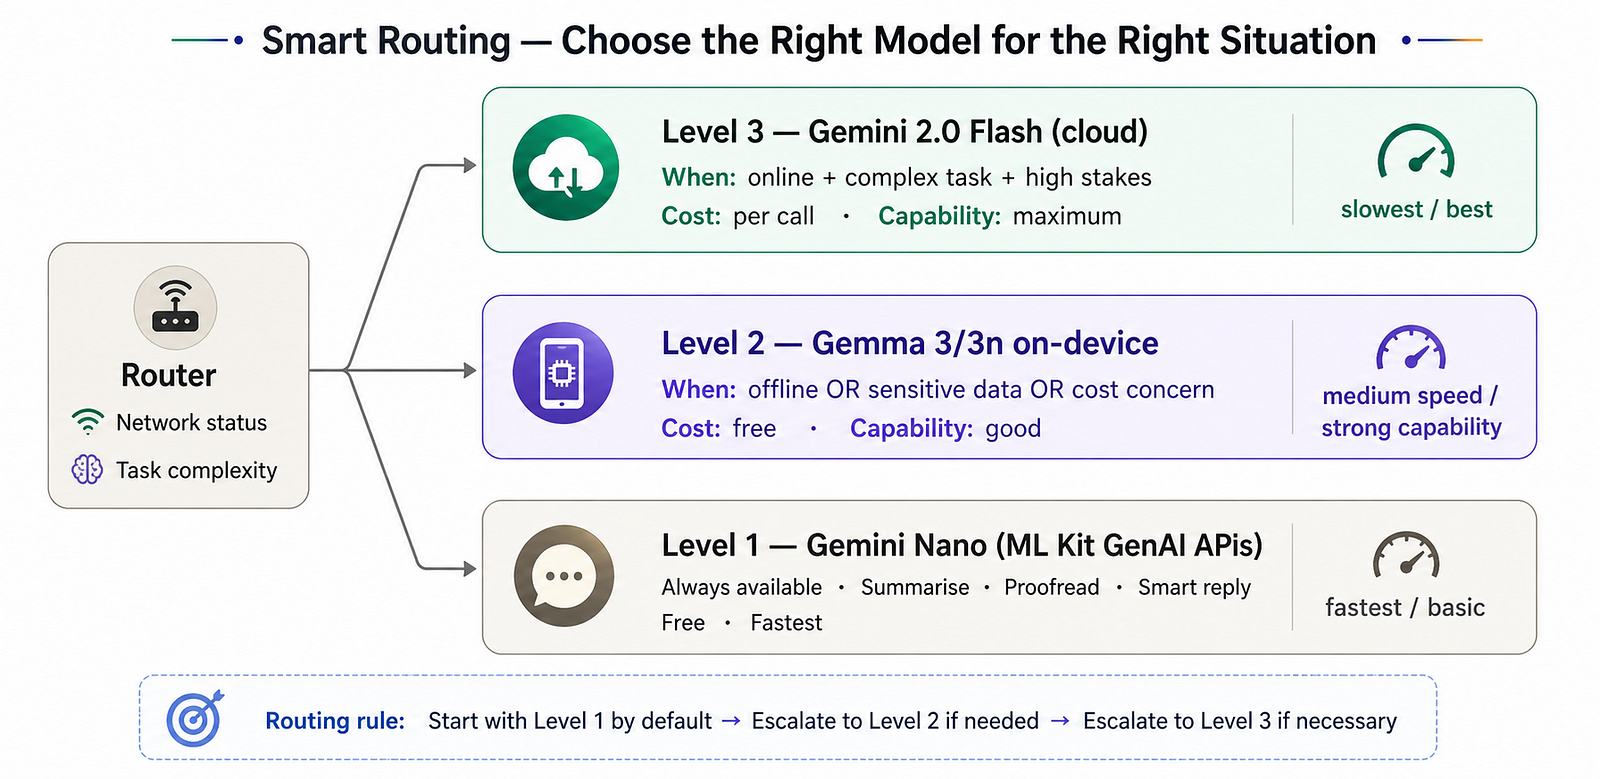
Every serious Android AI app should implement this three-level architecture.
Level 1 (Gemini Nano / ML Kit) is always there for basic tasks.
Level 2 (Gemma on-device) handles complex tasks privately and offline. Level 3 (Gemini cloud) handles tasks that require maximum intelligence and the user is online. The router makes this decision in milliseconds, invisibly to the user.
How Gemma Works on Android — The Architecture

Before we write any code, let’s understand how a prompt actually flows through the Android system.
When the user types something like “Summarize this article” in your app, here is what happens:
Layer 1 — Your App (Kotlin/Java): Your app captures the user input through Jetpack Compose UI.
Layer 2 — API Layer: You call one of three APIs (we’ll cover all three): ML Kit GenAI Prompt API, MediaPipe LLM Inference, or LiteRT-LM.
Layer 3 — The Gemma Model: A .task or .litertlm file (the model weights, usually 500 MB to 2 GB depending on the variant).
Layer 4 — Runtime Engine: LiteRT (formerly TensorFlow Lite), powered by libraries like XNNPack and ML Drift, optimizes how the math is done.
Layer 5 — Android AICore: A system service introduced by Google that manages the model files, decides whether to use CPU/GPU/NPU, and shares model memory across apps.
Layer 6 — Device Hardware: The actual silicon — Tensor chips on Pixel devices, Snapdragon Neural Processing Units (NPU), or just the CPU/GPU.
This stack is important because the higher API you choose, the less you have to worry about the lower layers.
Three Ways to Use Gemma on Android
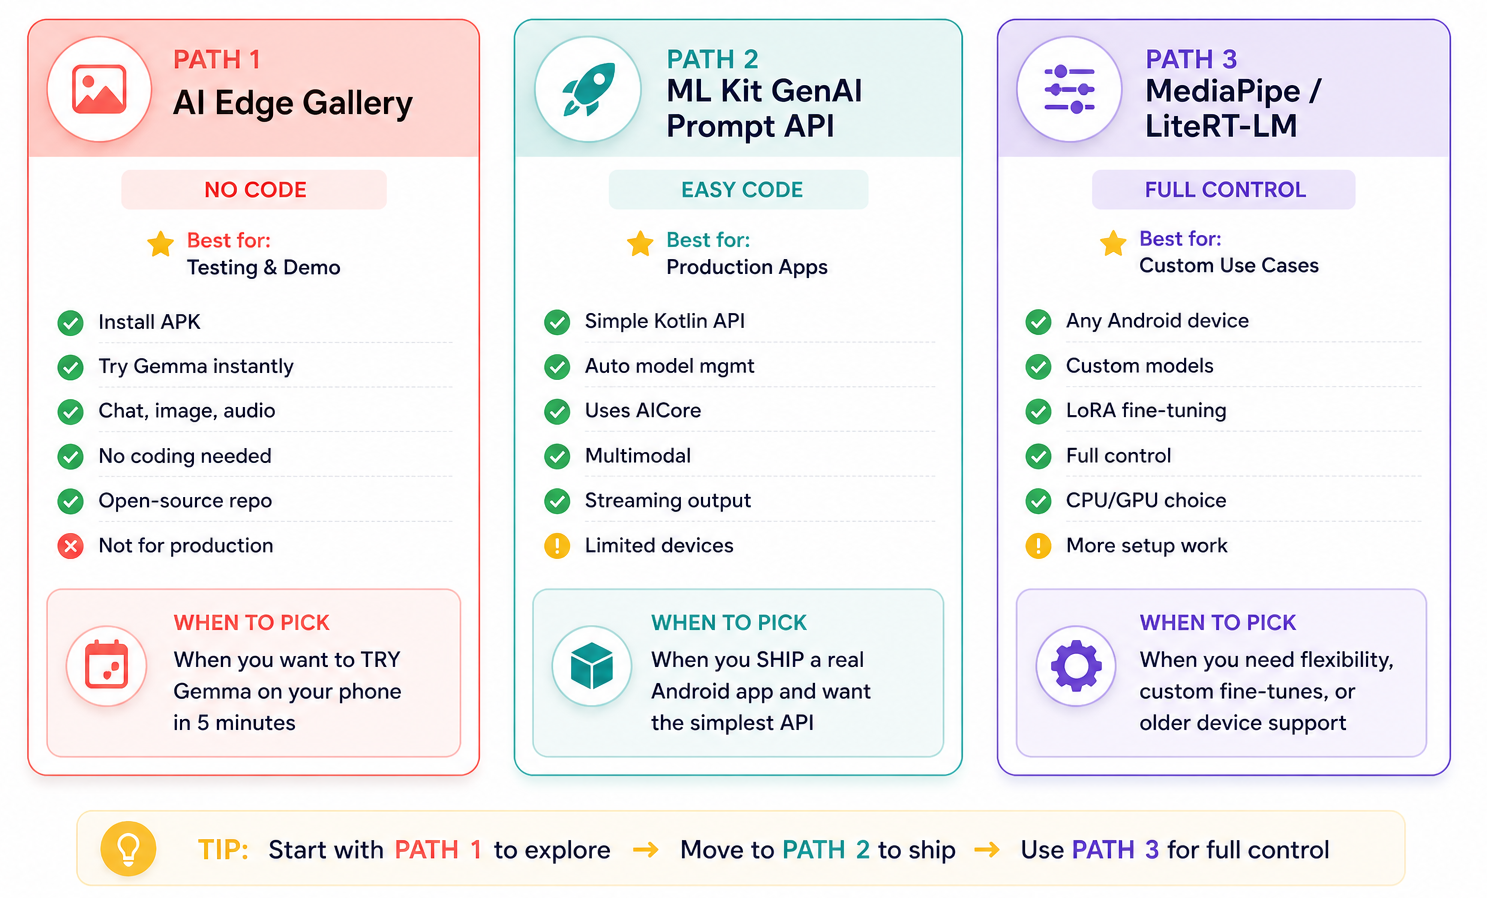
You have three different paths depending on your goal. Let me explain each.
Path 1 — Google AI Edge Gallery (No Code)
The fastest way to play with Gemma. This is an official open-source app from Google that lets you download Gemma models and chat with them right on your phone.
Best for: Testing, demos, learning what Gemma can do.
Path 2 — ML Kit GenAI Prompt API (Easy Code)
The simplest path for production apps. You add one dependency, write 10 lines of Kotlin, and you’re done. Google’s AICore handles model downloads, memory, and hardware acceleration automatically.
Best for: Shipping real Android apps where you want minimum boilerplate.
Path 3 — MediaPipe LLM Inference / LiteRT-LM (Full Control)
The most flexible approach. You bundle the model file yourself, control exactly how it loads, support older devices that don’t have AICore, and can use custom fine-tuned models.
Best for: Custom use cases, fine-tuned models, broader device support.
Now let me walk you through each path with full setup and code examples.
Path 1 — Try Gemma in 5 Minutes (AI Edge Gallery)
This is the easiest start. No Android Studio. No code.
Step 1: Get the App
Open the Google Play Store on an Android 12+ device and search for “Google AI Edge Gallery”. Install it. (For users without Play access, you can also sideload the APK from the GitHub releases page.)
Step 2: Download a Model
Open the app. You will see a model gallery. Pick:
- Gemma 4 E2B if your phone has 4–6 GB of RAM.
- Gemma 4 E4B if you have 8 GB+ RAM.
The app will download the model from Hugging Face directly. This takes a few minutes.
Step 3: Try the Features
The Gallery has several modes:
- AI Chat — Multi-turn conversations with a Thinking Mode toggle so you can see reasoning steps.
- Ask Image — Point your camera at something and ask questions.
- Audio Scribe — Record your voice and get transcription with translation.
- Prompt Lab — A workspace to test prompts with adjustable parameters like temperature.
- Mobile Actions — Control your phone with natural language (powered by FunctionGemma 270M).
- Agent Skills — Multi-step autonomous tasks like querying Wikipedia.
That’s it. You’re now running a state-of-the-art AI on your phone, fully offline.
If you want to study the implementation, the entire app is open-source on GitHub (Kotlin + Jetpack Compose), so you can fork it and use it as a reference.
Path 2 — Build Your First App with ML Kit GenAI Prompt API
This is the recommended path for building a real Android app. Let me show you a complete working example.
What We Will Build
A simple Smart Note Assistant that takes a long note and returns a short summary. Fully on-device. No internet after setup.
Step 1: Prerequisites
You need:
- Android Studio (latest stable version, e.g. Panda 3 or newer).
- A physical Android device (not emulator) running Android 14+ for full AICore support. Pixel 8 Pro and newer, Samsung Galaxy S24 series, and similar flagship devices currently support the Prompt API best.
- Min SDK 24 in your project.
Step 2: Enable AICore on Your Device
This is a one-time setup:
- On your Android phone, open the Play Store.
- Search for “Android AICore” and opt into the beta program.
- Wait up to an hour for the AICore app to install.
- Open AICore, accept the terms, and download the Gemma 4 model (E2B or E4B).
The first inference after download can take up to a minute because the model is being loaded into memory. Subsequent calls are fast.
Step 3: Create a New Android Project
In Android Studio: File → New → New Project → Empty Activity. Name it GemmaSmartNotes.
Step 4: Add the Dependency
Open app/build.gradle.kts and add this inside the dependencies block:
dependencies {
    implementation("com.google.mlkit:genai-prompt:1.0.0-beta2")

    // For coroutines (we will use them for async calls)
    implementation("org.jetbrains.kotlinx:kotlinx-coroutines-android:1.8.0")

    // Jetpack Compose (if not already added)
    implementation("androidx.activity:activity-compose:1.9.0")
}
Sync your Gradle.
Step 5: Add Internet Permission
Open AndroidManifest.xml and add:
<uses-permission android:name="android.permission.INTERNET" />
This is only needed for the initial model download via AICore. After that, your app runs fully offline.
Step 6: Write the Logic — Check Model Status
Create a new Kotlin file called GemmaService.kt:
import com.google.mlkit.genai.common.FeatureStatus
import com.google.mlkit.genai.prompt.Generation
import com.google.mlkit.genai.prompt.GenerativeModelFutures
import com.google.mlkit.genai.prompt.DownloadCallback
import com.google.common.util.concurrent.FutureCallback
import com.google.common.util.concurrent.Futures
import com.google.common.util.concurrent.MoreExecutors

class GemmaService {

    private val generativeModel = GenerativeModelFutures.from(
        Generation.getClient()
    )

    fun checkAndPrepareModel(onReady: () -> Unit, onError: (String) -> Unit) {
        Futures.addCallback(
            generativeModel.checkStatus(),
            object : FutureCallback<Int> {
                override fun onSuccess(status: Int?) {
                    when (status) {
                        FeatureStatus.AVAILABLE -> {
                            // Model is downloaded and ready to use
                            onReady()
                        }
                        FeatureStatus.DOWNLOADABLE -> {
                            // Need to download — trigger download
                            downloadModel(onReady, onError)
                        }
                        FeatureStatus.DOWNLOADING -> {
                            onError("Model is downloading, please wait...")
                        }
                        FeatureStatus.UNAVAILABLE -> {
                            onError("This device does not support Gemma yet.")
                        }
                    }
                }

                override fun onFailure(t: Throwable) {
                    onError("Status check failed: ${t.message}")
                }
            },
            MoreExecutors.directExecutor()
        )
    }

    private fun downloadModel(onReady: () -> Unit, onError: (String) -> Unit) {
        generativeModel.download(object : DownloadCallback {
            override fun onDownloadStarted(totalBytes: Long) {
                println("Download started: $totalBytes bytes")
            }

            override fun onDownloadProgress(downloadedBytes: Long) {
                println("Downloaded: $downloadedBytes bytes")
            }

            override fun onDownloadCompleted() {
                onReady()
            }

            override fun onDownloadFailed(e: Exception) {
                onError("Download failed: ${e.message}")
            }
        })
    }
}
Step 7: Generate Content (The Actual AI Part)
Add this method inside GemmaService.kt:
import com.google.mlkit.genai.prompt.generateContentRequest
import com.google.mlkit.genai.prompt.TextPart
import kotlinx.coroutines.suspendCancellableCoroutine
import kotlin.coroutines.resume

suspend fun summarizeNote(note: String): String =
    suspendCancellableCoroutine { continuation ->

        val prompt = """
            You are a helpful assistant. Summarize the following note in
            2-3 short bullet points. Be concise.

            Note:
            $note

            Summary:
        """.trimIndent()

        val request = generateContentRequest(TextPart(prompt))

        Futures.addCallback(
            generativeModel.generateContent(request),
            object : FutureCallback<GenerateContentResponse> {
                override fun onSuccess(response: GenerateContentResponse?) {
                    val text = response?.candidates?.firstOrNull()
                        ?.content?.parts?.firstOrNull()
                        ?.asTextPart()?.text ?: "No response"
                    continuation.resume(text)
                }

                override fun onFailure(t: Throwable) {
                    continuation.resume("Error: ${t.message}")
                }
            },
            MoreExecutors.directExecutor()
        )
    }
Step 8: Build the UI with Jetpack Compose
In MainActivity.kt:
import android.os.Bundle
import androidx.activity.ComponentActivity
import androidx.activity.compose.setContent
import androidx.compose.foundation.layout.*
import androidx.compose.material3.*
import androidx.compose.runtime.*
import androidx.compose.ui.Modifier
import androidx.compose.ui.unit.dp
import kotlinx.coroutines.launch

class MainActivity : ComponentActivity() {
    override fun onCreate(savedInstanceState: Bundle?) {
        super.onCreate(savedInstanceState)
        setContent {
            MaterialTheme {
                SmartNotesApp()
            }
        }
    }
}

@Composable
fun SmartNotesApp() {
    val gemmaService = remember { GemmaService() }
    var noteText by remember { mutableStateOf("") }
    var summary by remember { mutableStateOf("") }
    var isLoading by remember { mutableStateOf(false) }
    var modelReady by remember { mutableStateOf(false) }

    val scope = rememberCoroutineScope()

    // Check model on launch
    LaunchedEffect(Unit) {
        gemmaService.checkAndPrepareModel(
            onReady = { modelReady = true },
            onError = { summary = it }
        )
    }

    Column(
        modifier = Modifier
            .fillMaxSize()
            .padding(16.dp)
    ) {
        Text(
            "Smart Notes (Powered by Gemma)",
            style = MaterialTheme.typography.headlineMedium
        )

        Spacer(Modifier.height(16.dp))

        OutlinedTextField(
            value = noteText,
            onValueChange = { noteText = it },
            label = { Text("Paste your note here") },
            modifier = Modifier
                .fillMaxWidth()
                .height(200.dp)
        )

        Spacer(Modifier.height(16.dp))

        Button(
            onClick = {
                isLoading = true
                scope.launch {
                    summary = gemmaService.summarizeNote(noteText)
                    isLoading = false
                }
            },
            enabled = modelReady && !isLoading && noteText.isNotEmpty()
        ) {
            Text(if (isLoading) "Thinking..." else "Summarize")
        }

        Spacer(Modifier.height(16.dp))

        if (summary.isNotEmpty()) {
            Card(modifier = Modifier.fillMaxWidth()) {
                Text(
                    summary,
                    modifier = Modifier.padding(16.dp)
                )
            }
        }
    }
}
Step 9: Run It
Connect your supported physical device via USB, click Run, and try pasting any long note. The first call may take 30–60 seconds while the model warms up. After that, summaries appear in 1–3 seconds.
You just shipped your first on-device AI feature.
Path 3 — MediaPipe LLM Inference (Full Control)
If you want to use Gemma on devices that don’t have AICore, or if you have a custom fine-tuned model, this path is for you.
Important: As of April 2026, Google has marked the MediaPipe LLM Inference Android API as deprecated and recommends migrating to LiteRT-LM for new projects. However, MediaPipe is still widely used and works well, so I’m covering it because most existing tutorials reference it. The patterns translate directly to LiteRT-LM.
Step 1: Add the Dependency
In app/build.gradle.kts:
dependencies {
    implementation("com.google.mediapipe:tasks-genai:0.10.27")
}
Step 2: Download a Gemma Model
Go to the LiteRT Community on Hugging Face and download a pre-converted Gemma 3 model in .task format. For example: gemma3-1b-it-int4.task (about 530 MB).
Step 3: Push the Model to Your Device
Models are too big to bundle in an APK, so during development you push them to your phone using ADB:
adb shell rm -r /data/local/tmp/llm/
adb shell mkdir -p /data/local/tmp/llm/
adb push gemma3-1b-it-int4.task /data/local/tmp/llm/gemma3.task
For production, you would download the model at runtime from your own server (or use AICore in Path 2).
Step 4: Initialize MediaPipe in Kotlin
Create MediaPipeGemma.kt:
import android.content.Context
import com.google.mediapipe.tasks.genai.llminference.LlmInference
import com.google.mediapipe.tasks.genai.llminference.LlmInferenceSession

class MediaPipeGemma(context: Context) {

    private val llmInference: LlmInference
    private var session: LlmInferenceSession? = null

    init {
        val taskOptions = LlmInference.LlmInferenceOptions.builder()
            .setModelPath("/data/local/tmp/llm/gemma3.task")
            .setMaxTokens(1024)
            .setPreferredBackend(LlmInference.Backend.GPU)
            .build()

        llmInference = LlmInference.createFromOptions(context, taskOptions)

        // Create a session for multi-turn conversation
        val sessionOptions = LlmInferenceSession.LlmInferenceSessionOptions.builder()
            .setTemperature(0.7f)
            .setTopK(40)
            .build()

        session = LlmInferenceSession.createFromOptions(llmInference, sessionOptions)
    }

    fun generate(prompt: String): String {
        session?.addQueryChunk(prompt)
        return session?.generateResponse() ?: "Error"
    }

    // For streaming output (token by token)
    fun generateStreaming(
        prompt: String,
        onPartial: (String) -> Unit,
        onComplete: () -> Unit
    ) {
        session?.addQueryChunk(prompt)
        session?.generateResponseAsync { partialResult, done ->
            onPartial(partialResult)
            if (done) onComplete()
        }
    }

    fun close() {
        session?.close()
        llmInference.close()
    }
}
Step 5: Use It in Your App
@Composable
fun ChatScreen(context: Context) {
    val gemma = remember { MediaPipeGemma(context) }
    var input by remember { mutableStateOf("") }
    var response by remember { mutableStateOf("") }

    Column(modifier = Modifier.padding(16.dp)) {
        OutlinedTextField(
            value = input,
            onValueChange = { input = it },
            label = { Text("Ask anything") }
        )

        Button(onClick = {
            response = ""
            gemma.generateStreaming(
                prompt = input,
                onPartial = { partial -> response += partial },
                onComplete = { /* done */ }
            )
        }) {
            Text("Send")
        }

        Text(response, modifier = Modifier.padding(top = 16.dp))
    }

    DisposableEffect(Unit) {
        onDispose { gemma.close() }
    }
}
The generateStreaming method gives you a ChatGPT-like experience where text appears word-by-word as the model generates it.
Choosing the Right Gemma Model for Your Phone
This is one of the most common mistakes — picking a model too big for the device. Here is a quick rule of thumb:
- Phones with 4 GB RAM → Gemma 3 1B (about 530 MB on disk).
- Phones with 6–8 GB RAM → Gemma 4 E2B (under 1.5 GB memory at runtime).
- Phones with 8 GB+ RAM → Gemma 4 E4B (best quality on phones).
- Tablets and laptops with 16 GB+ RAM → Gemma 4 26B / 31B (server-grade).
Always use the 4-bit quantized versions (filename usually has int4 or q4) for mobile. They are about 4x smaller than 16-bit versions with very small quality loss.
Real World Use Cases (What You Can Build)
Here are practical features Gemma is great for on Android:
Smart Reply — Suggest contextual replies in a chat app based on the conversation. Gemma 3 1B is fast enough for real-time suggestions.
Document Q&A — Combined with the AI Edge RAG SDK, ingest user documents and answer questions about them.
Data Captioning — Turn raw app data into engaging summaries. Example: a sleep tracking app converts “7 hours, 5 wake-ups” into “You slept well for 7 hours but stirred awake 5 times between 2am and 4am.”
In-Game NPC Dialog — Generate dynamic dialog for non-player characters based on the current game state.
Offline Translation — With 140+ language support, Gemma can translate without ever calling a server.
Accessibility Tools — Audio Scribe-style transcription, image description for visually impaired users, content simplification.
Local Code Assistant — Gemma 4 in Android Studio Agent Mode can refactor, explain, and write code without sending it to the cloud.
Voice Assistants — Gemma 4 E2B and E4B have native audio input, so you can build voice features without a separate speech-to-text service.
Performance Tips
A few hard-learned lessons from real apps:
- Warm up the model on app start — The first inference is always slow. Call
checkStatus()or do a tiny prompt early so the user doesn't wait later. - Use sessions for multi-turn chat —
LlmInferenceSessionkeeps conversation context efficiently. Don't recreate it for every message. - Keep prompts concise — Verbose preambles slow you down. Be direct and focused.
- Keep output short — Inference time scales linearly with output length. Tell the model “in 2 sentences” or “as bullet points.”
- Choose the right backend —
setPreferredBackend(GPU)is usually fastest, but on some chips CPU with XNNPack can match it. Benchmark on your target devices. - Use streaming — Never make users wait for the full response. Stream tokens as they generate so the UI feels alive.
- Watch the heat — Continuous LLM use heats up phones. Throttle requests, and if a user runs many generations, give the chip a moment to cool.
Common Errors and Fixes
“Model not found at /data/local/tmp/llm/” — You forgot the adb push step or the path is wrong. Check the file is on the device with adb shell ls /data/local/tmp/llm/.
“Feature UNAVAILABLE” — Your device doesn’t support AICore yet. Check the official supported devices list, or fall back to MediaPipe / LiteRT-LM (Path 3).
“Out of memory” — Pick a smaller model. Drop from E4B to E2B, or from 4B to 1B.
First call extremely slow — This is normal. The model is being loaded into memory and the kernels are being JIT-compiled. Pre-warm it.
Garbage output — Check your prompt format. Gemma instruction-tuned models expect a specific chat template. The MediaPipe and ML Kit APIs handle this automatically, but if you’re using raw inference, you need the right template.
Summary
Let’s bring it all together one last time, so you walk away with a clear mental map of what you just learned.
The big idea: Gemma is Google’s open-source AI model family, built from the same research as Gemini, but small enough to run directly on phones, laptops, and even Raspberry Pi devices. Running AI on-device means complete privacy, zero per-request cost, instant response times, and full offline capability — four wins that cloud APIs can never match.
The journey from 2024 to 2026: Gemma started small in February 2024 with text-only 2B and 7B models. Gemma 2 brought architectural improvements like Grouped-Query Attention. Gemma 3 in March 2025 was the multimodal leap — image understanding, 128K context, and 140+ languages. Gemma 4 in April 2026 is the agentic generation, with native audio input, video understanding, thinking mode, and a new “Effective” architecture (E2B and E4B) that fits frontier-level capability into under 1.5 GB of phone memory.
The Android stack: Six layers move a prompt from your app to the chip — your Kotlin app, the API layer, the Gemma model file, the LiteRT runtime, Android AICore, and finally the device hardware (CPU, GPU, or NPU). The higher API you choose, the less you have to manage manually.
Three paths to ship:
- Path 1 — AI Edge Gallery is your no-code starting point. Install the app, download a model, and explore Gemma’s capabilities in five minutes. Best for learning and demos.
- Path 2 — ML Kit GenAI Prompt API is the production-ready path with the cleanest code. AICore handles model downloads, memory, and hardware acceleration automatically. Best for shipping real apps on supported flagship devices.
- Path 3 — MediaPipe / LiteRT-LM gives you full control. Bundle your own model, target older devices, use custom fine-tunes. Best for advanced use cases and broader device support.
Picking the right model: Match model size to device RAM. Gemma 3 1B for budget phones, Gemma 4 E2B for mid-range, Gemma 4 E4B for flagships, and the larger 26B and 31B variants for laptops or servers. Always use 4-bit quantized versions on mobile.
What you can actually build with this: Smart replies, document Q&A, offline translation, voice transcription, image description, in-game NPC dialog, accessibility tools, local code assistants, and full agentic workflows — all running without an internet connection.
The performance rules that matter: Warm up the model on launch, use sessions for multi-turn chat, keep prompts and outputs short, stream tokens for a responsive UI, choose the right backend for your hardware, and watch out for thermal throttling on long sessions.
If you’re picking just one thing to do after reading this, do this: install the AI Edge Gallery on your phone right now, download the Gemma 4 E2B model, and ask it something. The moment you see a real LLM running fully offline on your own device — no internet, no account, no cloud — the possibilities will click. From there, the code in this guide will get you to a shipped feature faster than you’d think.
Now go build something cool.
Thank you for reading. 🙌🙏✌.
Need 1:1 Career Guidance or Mentorship?
If you’re looking for personalized guidance, interview preparation help, or just want to talk about your career path in mobile development — you can book a 1:1 session with me on Topmate.
I’ve helped many developers grow in their careers, switch jobs, and gain clarity with focused mentorship. Looking forward to helping you too!
Found this helpful? Don’t forgot to clap 👏 and follow me for more such useful articles about Android development and Kotlin or buy us a coffee here ☕
Crack Android Interviews Like a Pro
Your complete Android interview preparation book — packed with real questions, deep explanations, and practical insights to help you stand out.
👉 Grab your copy now:
https://medium.com/@anandgaur2207/crack-android-interviews-with-confidence-the-only-handbook-youll-need-b87ec525f19c
𝗕𝗼𝗼𝗸 𝗣𝗿𝗲𝘃𝗶𝗲𝘄: https://drive.google.com/file/d/1uq8HUzp6tx63lrkw_vRoTxILdAFJuUwc/view?usp=sharing
If you need any help related to Mobile app development. I’m always happy to help you.
Follow me on:
More like this
 Android
Google I/O 2026 for Android Developers
If you watched the main Google I/O 2026 keynote on May 19 expecting Android news...
 Android
Build AI Agents Inside Your Android App with Agent Development Kit (ADK)
Google just made it possible to put real, thinking AI agents directly inside you...
 Android
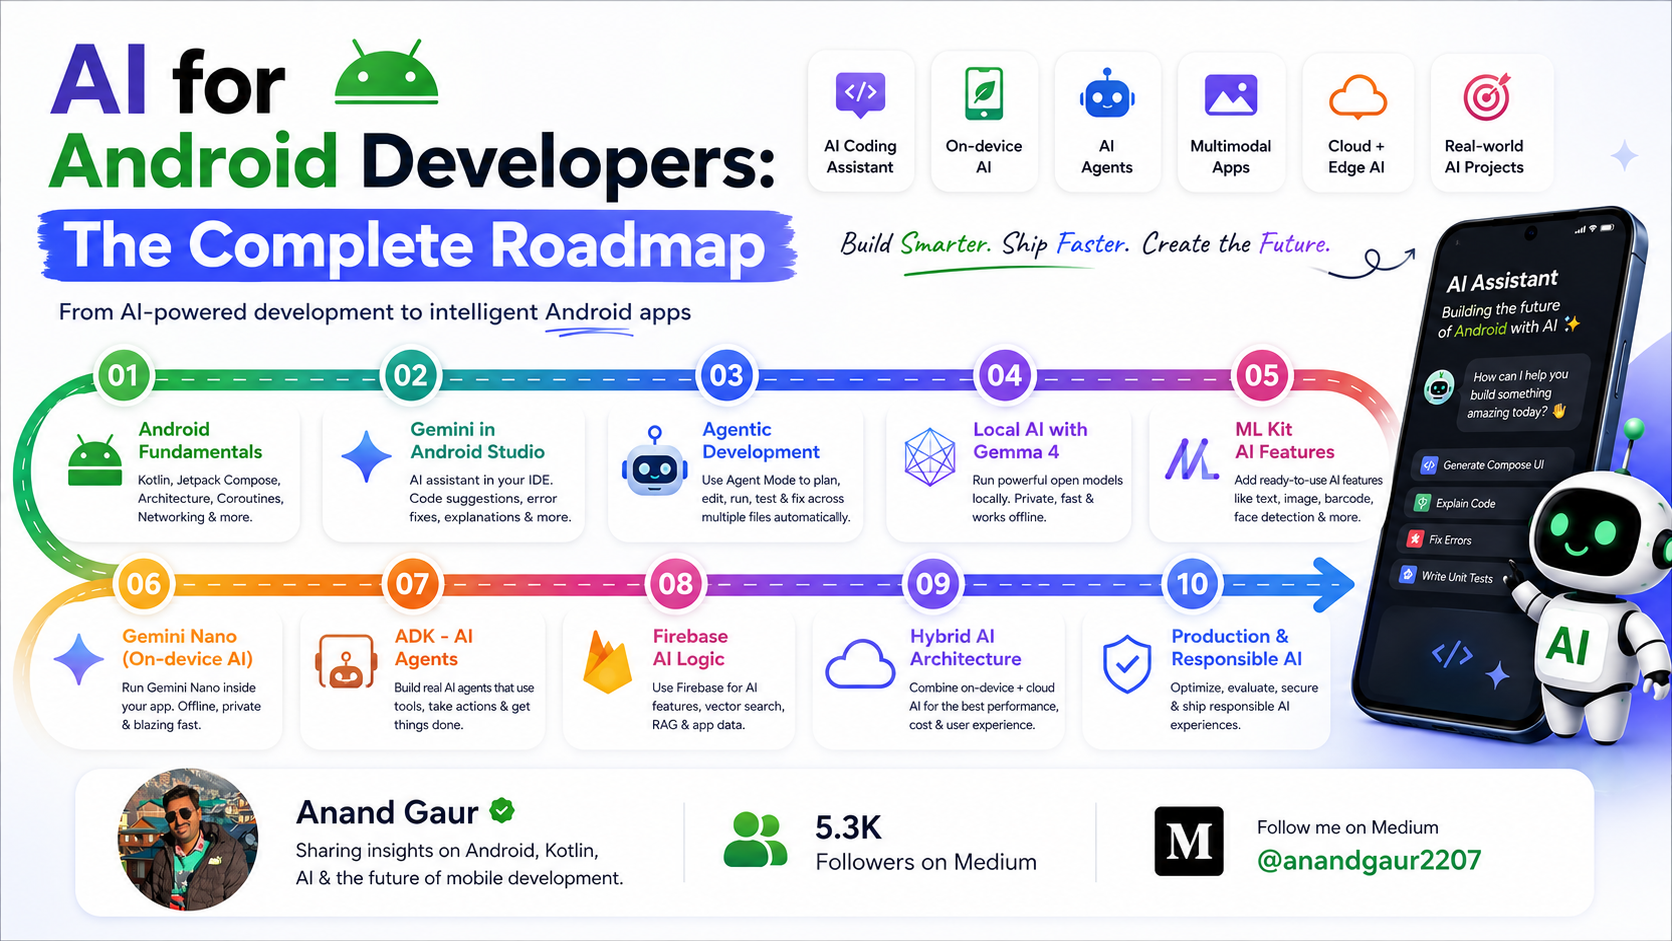
AI for Android Developers: The Complete Roadmap
How to use AI to build Android apps faster and how to build AI features into you...